 When it comes to make industrial automation equipment even smarter and more intelligent, the ability to post notifications in case of a failure is indispensable. Most modern PLCs, which are available nowadays, support this feature and can send mails using an SMTP server. This is also the case for the Siemens Simatic S7-1200 CPU, the mail server settings can be set easily using a function block. When the user program is running, a rising edge will trigger the function and the PLC posts a message to the SMTP server.
This is the basic idea, but -- as you may have guessed -- we have to cope with some limitations. Some compact PLCs (including the Simatic S7-1200) support mail servers listening on port 25 (SMTP) only. And this is where the trouble comes in:
- SMTP/25 is used for unencrypted (plain text) communication between the SMTP client and server
- plain text communication is undesired (and is bad practice, just don't do it) in public networks, such as the internet
- SMTP/25 would expose your credentials (username, password, message, etc.) to someone sniffing the traffic
- these are the reasons why most (serious) public e-mail providers do not accept SMTP on port 25, they block this port or do not listen on it
To circumvent the limitations described above, we need to extend our project, to ensure a secure and reliable solution in the end.
The Task
All modern (and serious) e-mail providers accept SMTP clients on ports 587 or 465 only, which forces the clients to use SSL/TLS cryptography to keep the information private. Compact PLCs (including the Simatic S7-1200) support SMTP mail transfer on port 25 only, they lack the ability to use SSL/TLS encryption.
To ensure a secure and reliable solution the only possibility is to introduce an adapter which supports SMTP/25 on the incoming side and SMTP/465 (or SMTP/587) on the outgoing side. This adapter will ensure the proper encryption of the whole traffic with an SMTP server. Such an adapter could be a Linux gateway or an edge computer.
This article covers two parts:
- Setting up Linux gateway (can be anything which uses Linux as its OS, even OpenWrt will work fine, a Raspberry Pi or a standard Linux computer)
- Setting up the E-Mail functionality for a Simatic S7-1200 using its internal Ethernet interface and the TMAIL_C function block.
Side Note
The S7-1200 limitation to use SMTP/25 is only valid for the internal Ethernet port. Siemens offers a communication module (aka CP) which allows SSL/TLS encrypted traffic between the PLC and the mail server. The communication module offers -- beside SSL/TLS connections to mail servers -- additional features, but is very costly. The proper communication module for the S7-1200 CPU could be the CP 1243-1.
In this project, I am using a gateway consciously because it has some major advantages over a CP from Siemens. A gateway is often cheaper and can be used for multiple PLCs, instead of a CP, which is directly attached and therefore bound to a single PLC. Additionally, a gateway offers more communication channels, such as WLAN, LTE, Ethernet, etc. and therefore adapts dynamically to the projects needs.
The Architecture
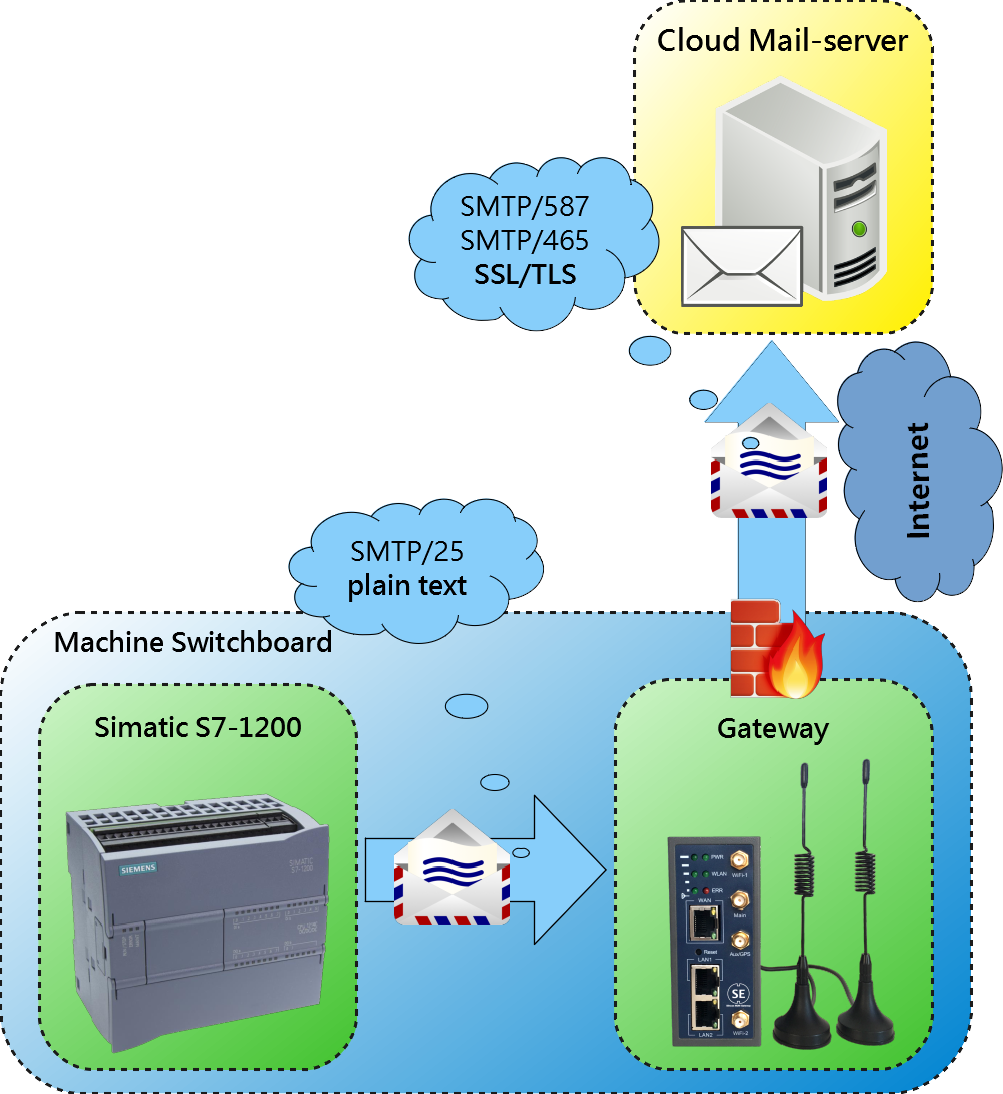 To implement our requirements we need a gateway which acts as the "adapter" between our PLC and the public mail server. Therefore, the gateway must be equipped with a relaying software which listens on its internal network on port SMTP/25 and can connect via SSL/TLS to public mail providers. This functionality is called mail relay or mail transfer agent (MTA).
Configuring the gateway is basically simple, but you should concentrate on what you do, because an SMTP misconfiguration could always lead to an open and unprotected MTA somewhere on the network.
The technical procedure will work as the following, the S7 uses the gateway as its internal mail server, connecting to port 25, user authentication disabled, encryption disabled. We can disable these security mechanisms in this case, because we assume that the PLC and the gateway are mounted physically on the same switchboard and are interconnected via a LAN cable, both share the same network. Additional peers, except a panel or HMI, do not exist.
The gateway has a working internet connection and can therefore handle outgoing connections, including the connection to a public mail server over the SMTP ports 587 and 465. The gateway supports SSL/TLS connections and can handle the corresponding certificates. When the gateway has a direct connection to the internet, it is important to configure the firewall correctly (which will not be covered by this article).
Gateway Configuration
Let's start the gateway configuration by installing the necessary packages on our hardware. Log in to your gateway/router/edge computer/server through ssh. I used postfix and configured it as a mail relay. For this project I rely on OpenWrt, because it supports lots of hardware, which is available at a fair price. Installing postfix requires almost 4 MB storage space which might not be available on cheap hardware. Installation is straight forward using opkg:opkg update && opkg install postfix
Once postfix installation completes, directly disable the service by typing:/etc/init.d/postfix disable && /etc/init.d/postfix stop
The postfix configuration file is residing in /etc/postfix/main.cf. The config is quite large and confusing, I recommend searching for the parameters inside the configuration file using nano. We start by adding a file which contains our user credentials, these are required to authenticate the gateway against the public e-mail service provider. I got a personal mail provider with my own domain and mailbox, but Gmail will do the job as well. (When using Gmail, you need to enable "allow less secure apps" beforehand, which technically just allows you to connect on port SMTP/587 and use STARTTLS, check Google's help. I recommend setting up a new Gmail account for this purpose.)
Navigate to /etc/postfix and add a new file using nano sasl_passwd
Add the following line to the empty file and save your changes -- gmail is just an example to make the syntax clearer, you know what I mean. Edit accordingly with your mail server settings:
[smtp.gmail.com]:587 username@gmail.com:password
Now we begin with the postfix configuration, fire up nano and edit the main.cf file nano /etc/postfix/main.cf
1. Securing postfix to prevent clients from undesired networks and interfaces
By default, postfix listens on all interfaces which are available. My gateway is connected through UMTS/LTE, this means right now postfix would accept clients from this network. This is undesired! I do not want to offer an open mail relay for spammers. We define the following, assuming the gateway's local address is 192.168.1.1, replace this with your settings. Search the configuration file for the following keys and add your settings accordingly:
inet_interfaces = 192.168.1.1
mynetworks = 127.0.0.1/8 192.168.1.0/24
Safe your changes, exit nano and check your changes by typing: postconf | grep mynetworks\ =
This should give you the network(s) for your internal interface only, this is where you will connect your PLC and all the other automation controllers, panels, etc.
2. Configuring the postfix SMTP client
Now we continue by setting up the client session, again open the configuration file and search for the keys to edit or add the values (gmail is just an example to make the syntax clearer). Edit accordingly with your mail server settings:
relayhost = [smtp.gmail.com]:587
smtp_use_tls = yes
smtp_enforce_tls = yes
smtp_tls_enforce_peername = no
smtp_sasl_auth_enable = yes
smtp_sasl_password_maps = texthash:/etc/postfix/sasl_passwd
smtp_sasl_security_options =
That is all for the SMTP client session, authentication with the mail server is going to be carried out using TLS encryption, I disabled peer name verification in the server certificate (smtp_tls_enforce_peername) because the verification requires the server name to be present in the certificate, this is not always the case. Check http://www.postfix.org/TLS_LEGACY_README.html#client_tls for further details.
Additionally, search for the following values, most likely they are not present in the config, add them
disable_vrfy_command = yes
mailbox_size_limit = 0
message_size_limit = 0
disable_vrfy_command = yes prevents someone to check whether a mail address exists, mailbox_size_limit and message_size_limit disables message size and mailbox size verification. This is necessary on embedded devices, because free space is extremely limited. We can risk this in this scenario, because we know that the messages send by our automation equipment will just be a few kilobytes, if sending larger messages, this will cause issues. Restart the service and reboot your system /etc/init.d/postfix enable && /etc/init.d/postfix restart
3. Test the postfix configuration using sendmail
Sendmail is a local mail client and allows you to send mails using the command line. This allows us to check our configuration from the command line without the need of setting up a mail client. Again, connect to your gateway/router/server/edge computer -- using ssh -- where you installed and configured postfix. Type the following:
root@gateway:~# sendmail This email address is being protected from spambots. You need JavaScript enabled to view it.
To: This email address is being protected from spambots. You need JavaScript enabled to view it.
From: This email address is being protected from spambots. You need JavaScript enabled to view it.
Subject: Testmail using sendmail (IoT Gateway)
Hello World
This is a test using sendmail directly from the postfix gateway
# control + d finishes the message and prepares for transmission

# the following shows the current mail queue
root@gateway:~# postqueue -p
Mail queue is empty

# empty queue most likely means that your mail has already been sent by postfix
If the configuration is valid, then you'll receive a mail at your given recipient address.
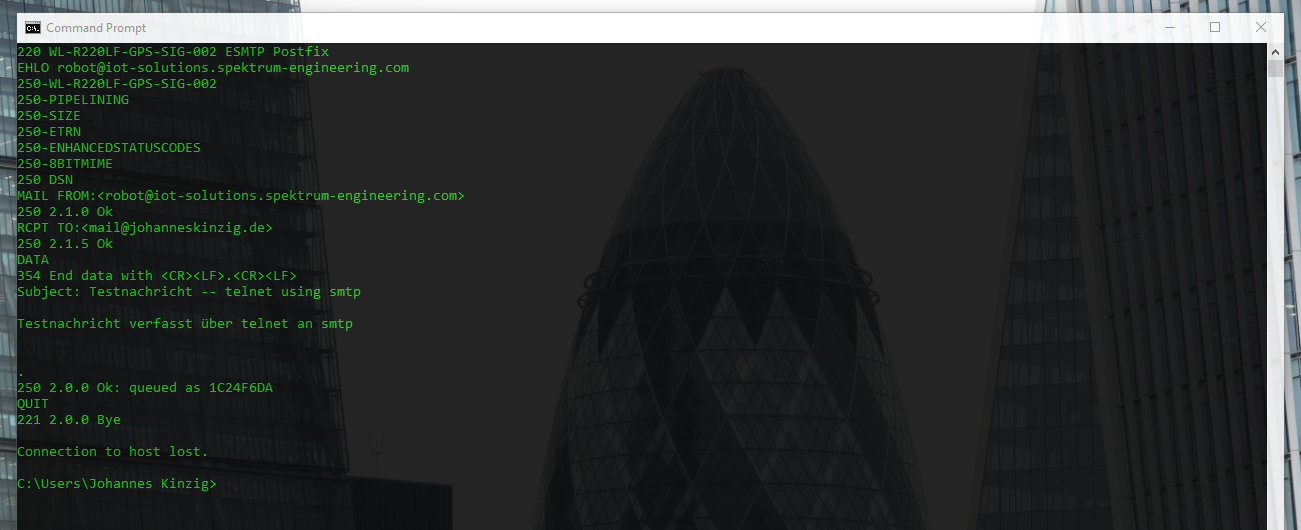
4. Test the postfix configuration using telnet
Now, use your development computer, which is attached to your gateway and open a terminal window, type:
telnet 192.168.1.1 25
Of course, the ip-address may vary depending on your configuration. Telnet connects to postfix using port 25 and you can talk to the postfix mail server like in the screenshot below:
 If sendmail worked correctly, then this will work as well and you'll receive your test message at the given recipient address.
PLC Programming
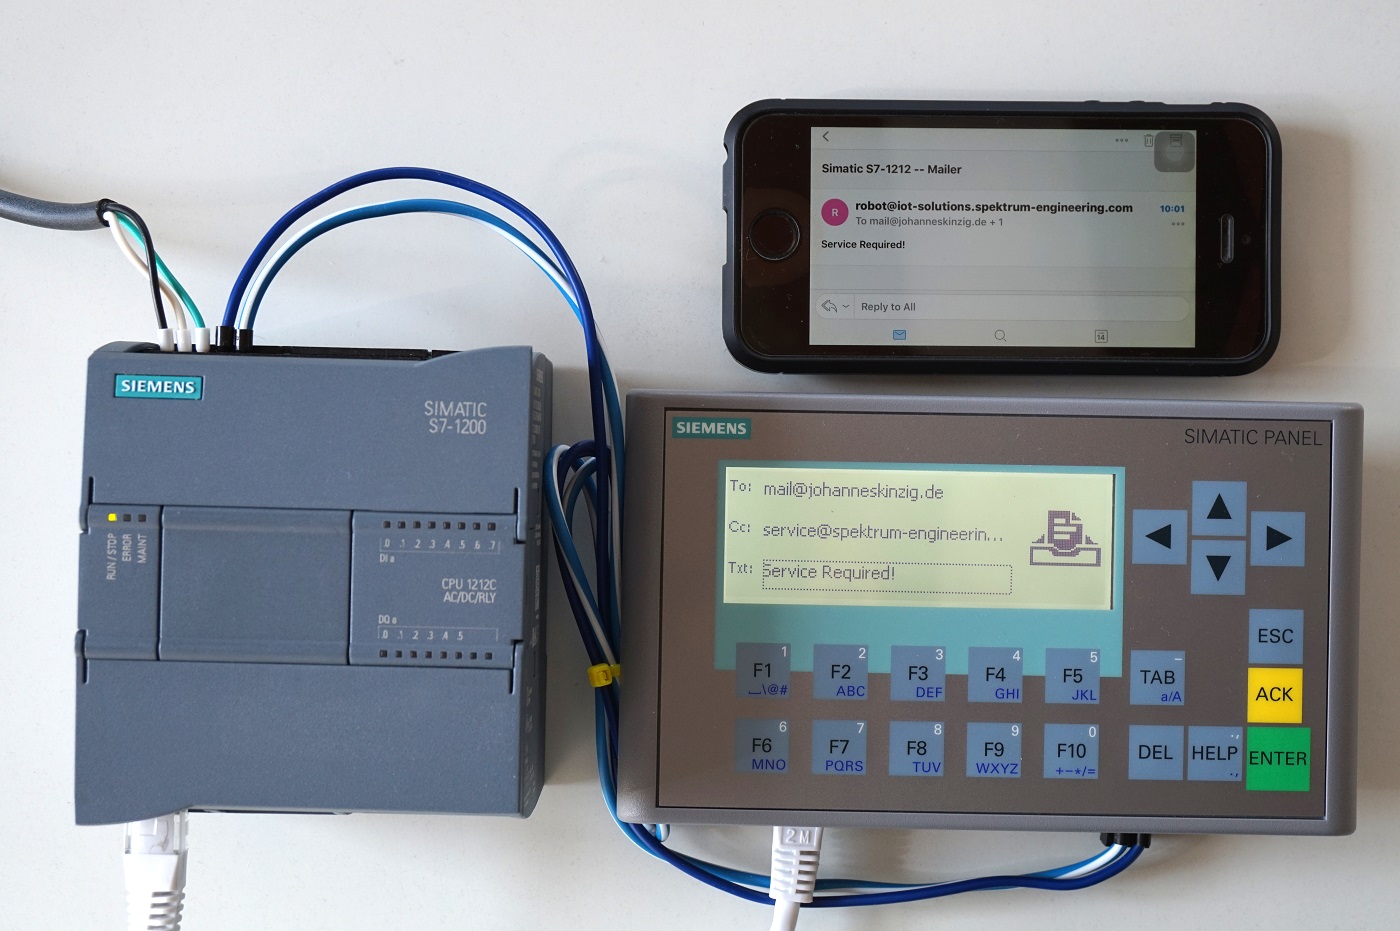
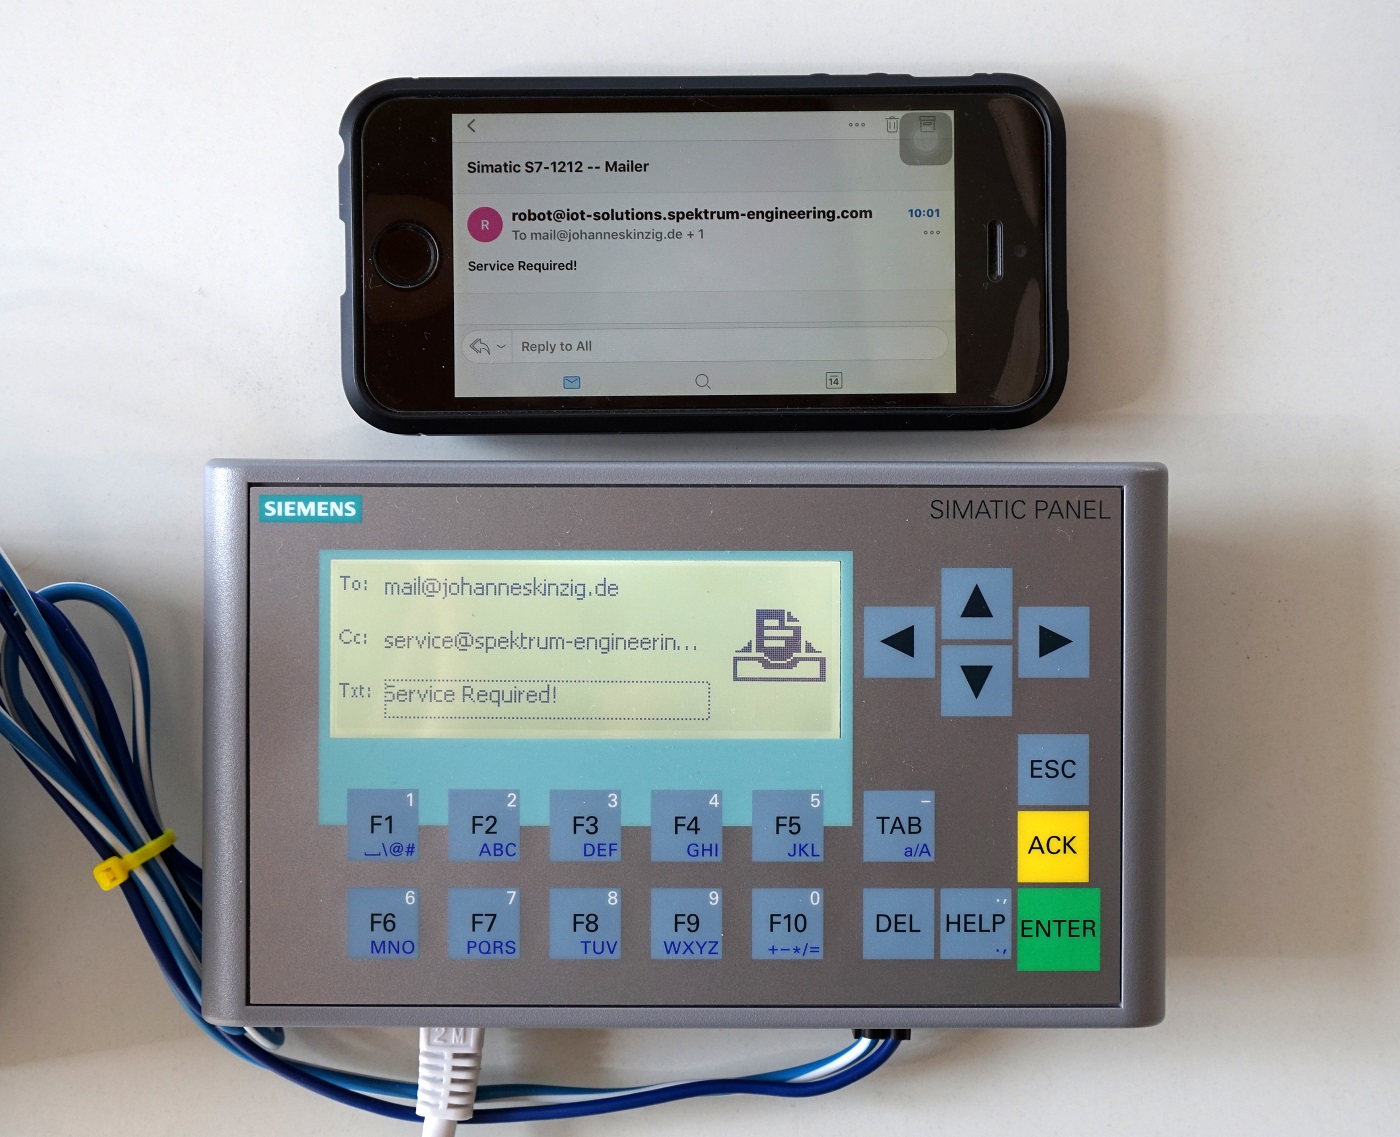
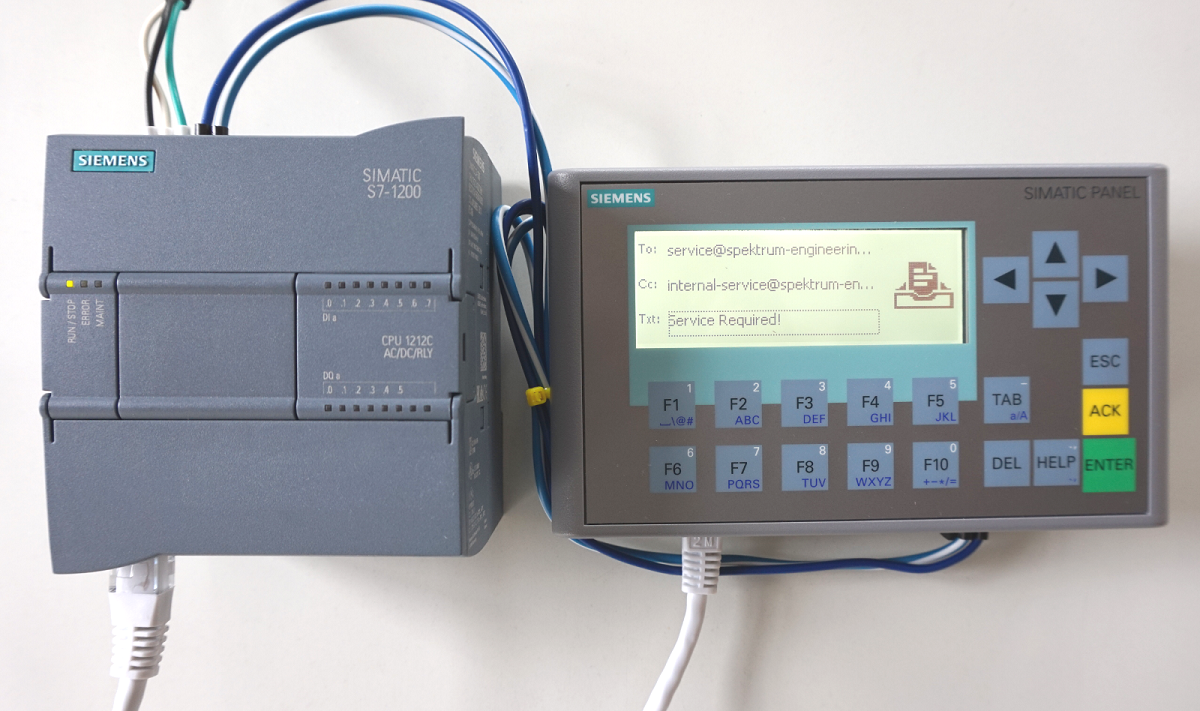
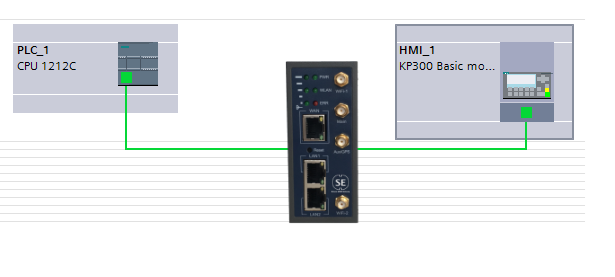
Now, that the gateway was configured correctly and mail transfer is working, we can start by programming our PLC, in this case a Siemens Simatic S7-1200. I attached a panel I had lying around to trigger the mail client more comfortable. My technical setup looks like this:
 Fire up TIA Portal and create a new project. Sending mail using the S7 is generally quite simple, but a bit tricky if you look at the details. I will explain all the steps I performed.
We start by adding a tag named trigger_send of type bool. If this is tag is pulled HIGH (True), the PLC will send a mail. 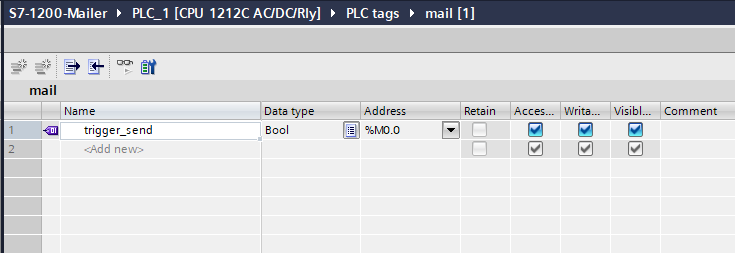
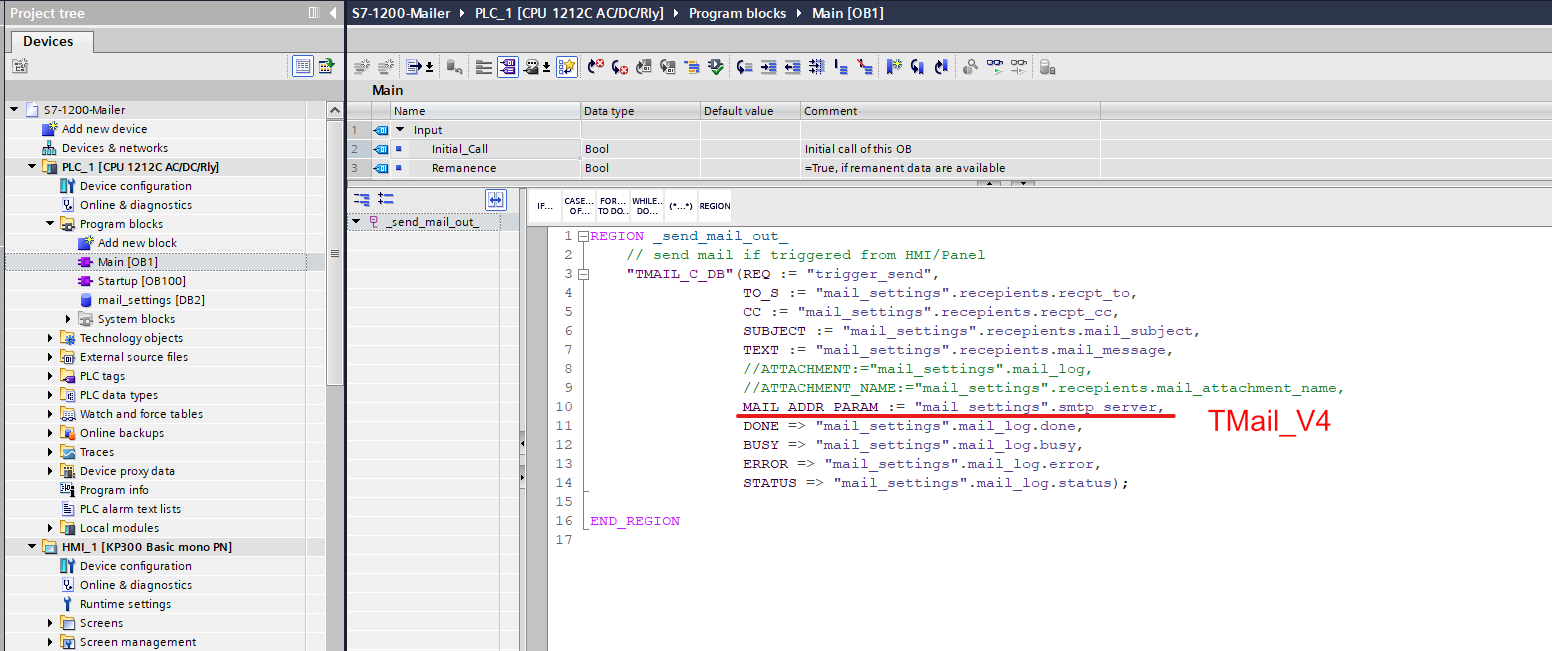
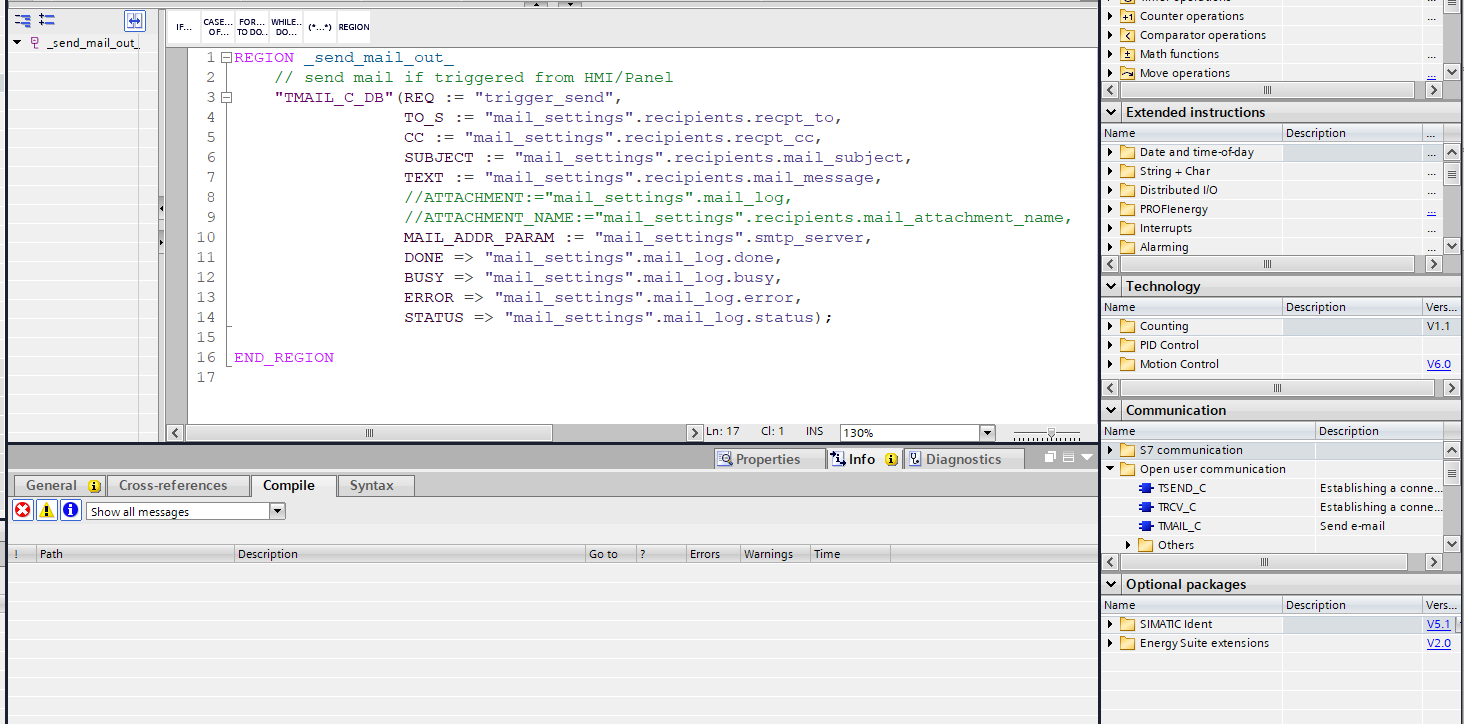 The next step is to take the function block TMAIL_C from the instructions tab (Communication .. Open user communication .. TMAIL_C) and insert the function in the main program block. (I am always using SCL for PLC programming, because everything else is not intuitive). This will give you the source template with the input and output parameters. Continue by adding a data block, I named mine mail_settings.
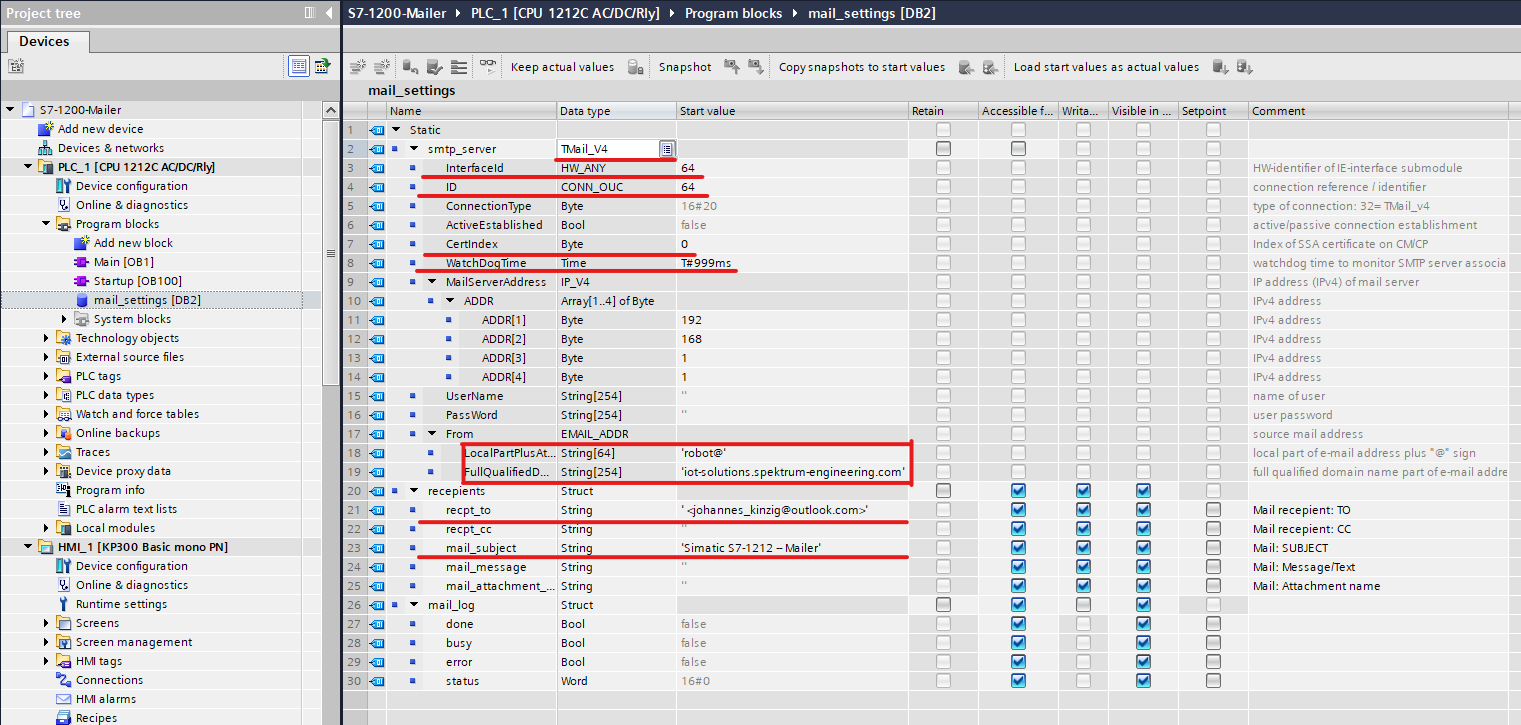 We start by creating the SMTP client configuration, TIA portal allows to set this using the data type TMail_V4. Create a new variable, mine is named smtp_server and specify the data type explicitly TMail_V4 (you need to type this in, it won't be displayed in the drop down menu). Once you've done this, the view will extend automatically and show you all the parameters you have to fill in. See the picture above, I will explain all the fields. (The instructions are described by the Siemens documentation, but lack the details, which makes it hard to get started out of the box.)
smtp_server |
Data Type |
Explanation |
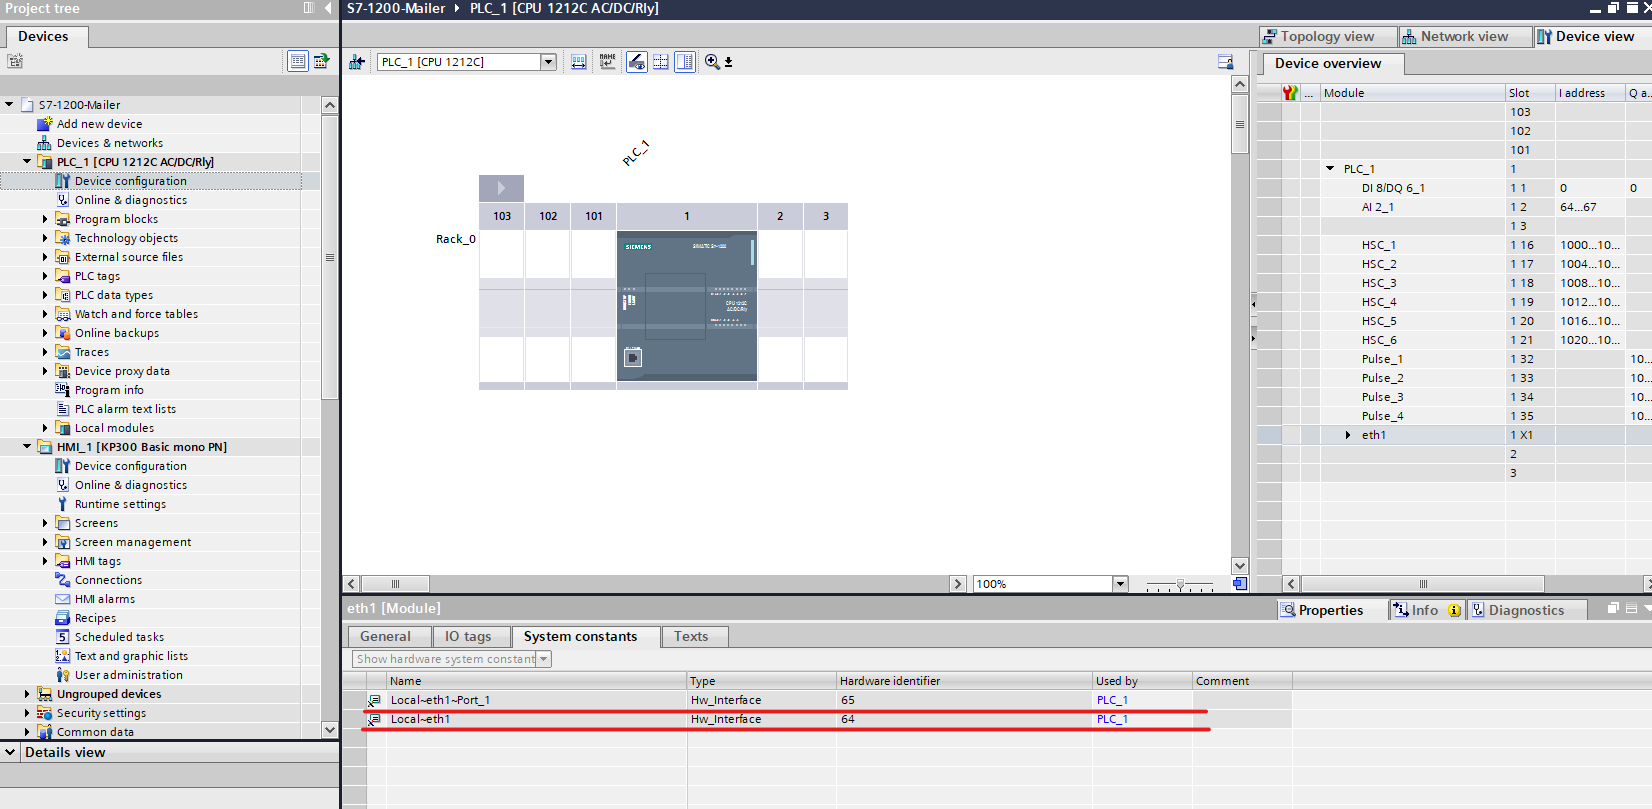
| InterfaceID | HW_ANY | The interface id needs to be set to tell the system which Ethernet port to use. If you have connected a CP, you have to specify the ethernet port explicitely. Look at the following picture to determine your interface id. |
| ID | CONN_OUC | The connection identifier, just give it the same attribute as the interface id |
| CertIndex | Byte | Give it a 0, generally it should match the certificate which is presented by the SMTP server. In this case we give it a 0 because the S7-1200 can't handel SSL/TLS connections using the nativ Ethernet port, therefore we cannot give a certificate for verification. |
| WatchDogTime | Time | If the specified mail server (our previously defined gateway) is not responding in the given time, mail transmission will be aborted by the PLC. Specify something larger than 500ms. |
| MailServerAddress | IP_V4 | The ip address of the gateway which has been configured with postfix, specify the octets independently. |
| LocalPartPlusAtSign | String | Mail "from" address, the sender, the prefix. This should match the sending mail address/usernme cofigured in the gateway (postifx settings). |
| FullQualifiedDomainName | String | Mail "from" address, the sender, the full qualified domain name. This should match the sending mail address/usernme cofigured in the gateway (postifx settings). |
 For the mail message settings I defined a struct named recipients. Defining the mail to and cc properties is a bit tricky but straight forward.
recipients |
Data Type |
Explanation |
| recpt_to | String |
The string has to start with a space and the mail address needs to be encapsulated in <>. Separate multiple recipients using a comma. Example: " < |
| recpt_cc | String | Same rules apply as shown for recpt_to |
That is basically the whole magic which need to be applied in the S7 user programm to send mails. The remaining fields are self explaining, to trigger the mail transmission either use a DI with push button attached or use a panel with a simple HMI configuration. Remember, you don't need much, just something to pull the tag HIGH.
Now, just map the settings from the data block to the function block TMAIL_C_DB in Main and you are ready to go. At the bottom on the page you can download the tia portal project.